How to make simple but effective cover art
With Samhain closing its doors, hundreds of authors are now wondering what to do with their backlists. I’ve been busily making mock-ups for new cover art for my own books, and I thought this might be a good time to repost this “Absolute basics of making your own cover art” post. Learning how to use a photoshop-type program like Gimp takes a long time and a lot of effort, so if you’re reasonably well off but short on time, I think your best option is probably to buy your Samhain covers, or pay a professional to make new ones. If you’re short on money but long on time, however, this might be the point to teach yourself how to make book covers.
First of all, go to http://www.gimp.org/ and download The GIMP. (This stands for “GNU Image Manipulation Program” and has nothing to do with leatherwear unless you want it to.) The Gimp is almost as powerful as Photoshop, more than capable of allowing you to make highly professional book covers, yet totally free.
It’s also offputtingly complicated and has no user manual, but who cares about that, right? 🙂
So, today let’s make a cover for a book which you are going to upload to Smashwords. Smashwords likes its book covers to be 2400 pixels tall by 1600 pixels wide. If you want to make a cover for Amazon, you’ll need to check what dimensions they recommend and use those instead.
Once you have the Gimp installed, fire it up and go to
File>New
This will give you a box called “create a new image.” Check that the little box on the right says “pixels.” If it doesn’t, scroll through the drop down menu and pick “pixels”. Then enter 2400 in the box that says “Height” and 1600 in the box that says “Width” and click on OK.
This gives you a nice white rectangle of the right size and shape for a book cover. Now you just have to fill it in.
For your first attempts at cover art, I recommend you go looking for single dramatic images which catch the eye and have something (it doesn’t have to be much) to do with your book’s theme.
I’m going to make a cover for a murder mystery, which I’ve decided is going to be called “The Prodigal.” It’s about the crimes solved by a drifter who spends his life on the road, unable to find anywhere to settle that isn’t stuffed full of secret sins.
What I do now is trawl through the stock photo sites, (canstockphoto, istockphoto, stock xchange, wikimedia) and find a really nice dramatic image. This stage can take days, but it’s worth holding out for that one great picture, because it’s the only really vital bit when you’re making a cover as uncomplicated as this one.
I’ve chosen this picture:

which I bought and downloaded from istockphoto.com
Now go back to gimp and open your picture using the File>Open menu.
Right click in the middle of your picture, and from the drop down menu you get, select Edit>Copy.
Go back to your blank white rectangle (the one which is going to be your cover,) right click on that and select Edit>Paste
Now go up to the top and click on Layer>New Layer.
This basically pastes your picture onto your book cover. However, the chances are that it is not yet the right size. So go to
Layer>Scale Layer, and in the box type 2400 in the box for Height and press OK. This will make your picture fit the height of your book cover, though it may mean that bits of the picture are too wide and hang over the edges. This is a good thing, as it means you can move the picture layer around until it looks really cool.
To move the picture layer around, go to the “Toolbox” box and click on the button that looks like a cross with arrowheads. This is the “Move” tool. Once you’ve clicked on it, put your cursor anywhere in the picture, hold the left mouse button down, and you can pick up and drag the picture wherever you want.
I’ve decided to go for a slightly asymmetrical look, while making sure I kept the lightning:

Now all I have to do is add the text. I always think it is nice to pick colours from the picture for the text, that way you don’t stand the chance of having one of those covers where the text looks as though it was pasted on from an entirely different book. We want the title and author name to look as if it belongs together with the picture, so let’s pick colours for them by using the “Colour Picker Tool”. This looks like a little eyedropper and can be found in the ‘toolbox’ box.
Now, we want the text to look like it belongs, but we also want it to stand out and be easy to read. I’m assuming I’m going to put the title up in the dark clouds at the top, so I want the text to be in a contrasting colour to the clouds. I think I’ll try either the white of the lightning strike or the yellow of the sun.
So, I click on the eyedropper symbol, and after that I put my cursor on top of the middle of the yellow sun and click. If I look over on the toolbox again, I see that where the two boxes at the bottom were once one black and one white, the upper one has now turned a bright yellow. This is the colour that the eyedropper picked up from the picture. The top box is the foreground colour – or the colour which the Gimp will use for any text or painting or airbrushing you might do.
I’m not sure how sinister that very bright yellow is, but let’s try it.
To put text on your picture, go to the text tool which looks like an ‘A’, and click on it. Now click on your picture and you’ll get a little box that says “GIMP Text Editor.” Type your book title in there and it will simultaneously show up on your picture.
The chances are it will be too small. So go over to the toolbox, and where it says “Size” click on the up arrow until you think it’s big enough.
Above the ‘size’ box is a box that says “Font”. Click on this to see a drop down menu of different styles for your lettering. You’ll need to experiment with selecting different fonts and adjusting the size to fit before you come up with something that you think you like.
This is a case of personal preference, so I can’t do more than say you should bear three things in mind for the title:
1. It should be decorative
2. It should be eyecatching
3. It should be easy to read.
It’s no good going for the coolest font ever if nobody can read what it says, but you don’t want a font that says “God, this book is boring” either. Use your judgement. Also, you don’t have to use the same font, or the same colour for every word in the title. Here I’ve decided that the yellow is a bit too cheerful to use for the whole thing, so I’ve picked the colour from the lightning for the main word, and just used yellow for “the.” By all means, emphasize the most important word in the title by making it bigger than the other words.
Each time you want to add a word you will have to do it by clicking on a different place in the picture, bringing up the text editor and typing only that word into the box. You can then move the separate words around separately because they are on different ‘layers’ of the cover. Press control + L to open up the layers dialogue so you can see which word is on which layer, then just highlight that layer by clicking on it, and you will be able to move that layer around independently of the others using the move tool.
Once you’ve got the title sorted out, it’s a case of more of the same for the author’s name. My advice for this one is that – unless you are a best selling author with a well known name – your author name should be more modest than your title. Choose a more subdued colour and simpler font, and make it smaller.
Type it in, move it around until you’re happy with where it is, and you’re done. Save the file as examplename.xcf as well as exporting it as examplename.jpg. The xcf extention is Gimp’s own file type, and allows you to save all your layers separately. This means you don’t need to re-do the whole thing every time you want to change something, so getting into the habit of always keeping the xcf will save you lots of grief down the line. I speak from bitter experience!
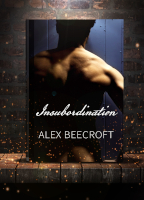
OK, here is my finished version:

It is simple, but I only promised simple! I still quite like it, though. I could live with that, particularly if it saved me the $100 or more I might have had to pay for someone else to make it for me.
Next time, if anyone’s interested, some slightly more complicated things you can do, if simple doesn’t cut your mustard.